Showing posts with label Windows Xp. Show all posts

Sunday, July 10, 2011

How To Hide Virus or other Private File into a Jpeg File Like File Binder

0 comments
In order to accomplish this task, you will need to have either WinZip or WinRAR installed on your computer. You can download either of these two off the Internet and use them without having to pay anything. Here are the steps for creating your hidden stash:

  • Create a folder on your hard drive, i.e. C:\Test and put in all of the files that you want to hide into that folder. Also, place the image that you will be using to hide the files in.
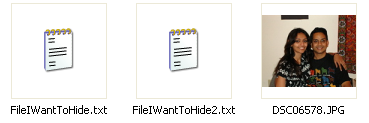
hide file in jpg
  • Now select all of the files that you want to hide, right-click on them, and choose the option to add them to a compressed ZIP or RAR file. Only select the files you want to hide, not the picture. Name it whatever you want, i,e. “Hidden.rar”.
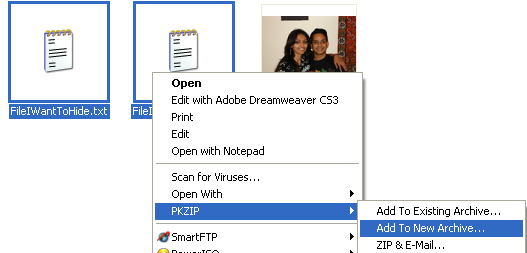
add to archive
  • Now you should have a folder that looks something like this with files, a JPG image, and a compressed archive:
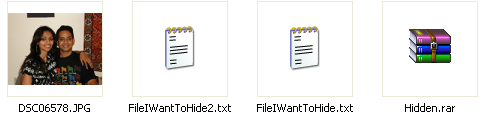
hidden rar
  • Now here’s the fun part! Click on Start, and then click on Run. Type in “CMD” without the quotes and press Enter. You should now see the command prompt window open. Type in “CD \” to get to the root directory. Then type CD and the directory name that you created, i.e. “CD Test“.
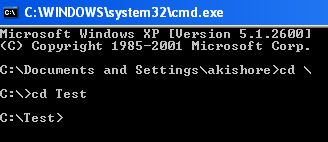
cd test
  • Now type in the following line: “copy /b DSC06578.JPG + Hidden.rar DSC06578.jpg” and press Enter. Do not use the quotes. You should get a response like below:

hide files in jpg
Just make sure that you check the file extension on the compressed file, whether it is .ZIP or .RAR as you have to type out the entire file name with extension in the command. I have heard that some people say that they have had problems doing this with a .ZIP extension, so if that doesn’t work, make sure to compress to a .RAR file.
And that’s it! The picture file will have been updated with the compressed archive inside! You can actually check the file size of the picture and see that it has increased by the same amount as the size of the archive.
You can access your hidden file in two ways. Firstly, simply change the extension to .RAR and open the file using WinRAR. Secondly, you can just right-click on the JPG image and choose Open With and then scroll down to WinRAR. Either way, you’ll see your hidden files show up that you can then extract out.
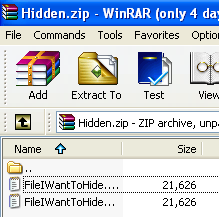
winrar
That’s it! That is all it takes to hide files inside JPG picture files! It’s a great way simply because not many people know it’s possible and no one even thinks about a picture as having to the ability to “hide” files. Enjoy!

Thursday, June 9, 2011

Automatic refresh trick

0 comments

Friends here is a trick how to refresh your windows computer automatic. When you are watching some movie or any thing online then you press F5 to refresh your computer now set your computer to automatic refresh. Basically it is a registry trick. Most of software which increase your computer just refresh your computer. Now increase your computer speed without using any software and save your hard space also save your physical memory by decreasing your running application
Follow these steps
1. Goto run and type regedit and hit enter
2. In regedit goto to this
HKEY_LOCAL_MACHINE\System\CurrentControlSet \Control\UpdateMode
3. Here on right side edit the DWORD value to be between 1 and 5 and restart your computer
enjoy this trick

create hidden drive in pc

0 comments
here’s how to implement the hack: first off, back up your registry as this requires adding a key to the registry. Once you’ve backed up your registry, open the registry editor by clicking on Start, Run and typing in regedit.


Now navigate to the following registry hive shown below:
HKEY_LOCAL_MACHINE\Software\Microsoft\Windows\CurrentVersion\
Policies\Explorer

Right-click on Explorer and choose New and then DWORD Value.


Name the new value NoDrives and then double click on it to open the properties dialog box. Click on Decimal for the Base unit


CHECK UR Computer's performance?

0 comments


Do u want to Monitor ur Computer's performance?

Go to:

>run
>Type: perfmon.msc
>Enter

CHANGE NAME OF RECYCLE BIN

0 comments


To change the name of the Recycle Bin desktop icon,
follow these steps
goto RUN type regedit
and then go to:

HKEY_CLASSES_ROOT/CLSID/{645FF040-5081-101B-9F08-00AA002F954E}

and change the name "Recycle Bin" to whatever you want (don't type any quotes).
plz leave ur comment

Sunday, May 22, 2011

folder options missing in windows explorer.

0 comments


Many of us sometimes find the folder options missing in windows explorer.
Here's the solution-->

Open Run and then type "gpedit.msc".
Now goto User Configuration > Administrative templates > Windows Component > Windows Explorer.

Click on Windows Explorer you will find the 3rd option on the right side of screen "Removes the Folder Option menu item from the Tools menu"

Just check it, if it is not configured then change it to enable by double clicking on it and after applying again set it to not configured.


now have a faster computer and 1-2GB of Virtual RAM..!

0 comments

Follow the steps given below :-


1) Hold down the 'Windows' Key and Press the 'Pause/Break' button at the top right of your keyboard.
Another way is Right-Clicking 'My Computer' and then Select 'Properties'.

2) Click on the 'Advanced' tab.

3) Under 'Performance', click 'Settings'.

4) Then click the 'Advanced' tab on the button that pops up.

5) Under 'Virtual Memory' at the bottom, click 'Change'.

6) Click the 'Custom Size' button.

7) For the initial size (depending on your HD space), type in anywhere from 1000-1500 (although I use 4000), and for the Maximum size type in anywhere from 2000-2500 (although I use 6000).

8) Click 'Set', and then exit out of all of the windows.

9) Finally, Restart your computer.

10) You now have a faster computer and 1-2GB of Virtual RAM..!

convert a FAT partition to NTFS

0 comments


To convert a FAT partition to NTFS, perform the following steps.

Click Start, click Programs, and then click Command Prompt. In Windows XP, click Start, click Run, type cmd and then click OK.

At the command prompt, type CONVERT [driveletter]: /FS:NTFS. Convert.exe will attempt to convert the partition to NTFS.


NOTE:=
Although the chance of corruption or data loss during the conversion from FAT to NTFS is minimal, it is best to perform a full backup of the data on the drive that it is to be converted prior to executing the convert command


Friday, April 29, 2011

DOS Commands

0 comments
DOS Commands
==========

Accessibility Controls - access.cpl
Add Hardware Wizard - hdwwiz.cpl
Add/Remove Programs - appwiz.cpl
Adobe Photoshop (if installed) - photoshop
Administrative Tools - control admintools
Automatic Updates - wuaucpl.cpl
Bluetooth Transfer Wizard - fsquirt
Calculator – calc
Certificate Manager - certmgr.msc
Character Map - charmap
Check Disk Utility - chkdsk
Clipboard Viewer - clipbrd
Command Prompt - cmd
Component Services - dcomcnfg
Computer Management - compmgmt.msc
Date and Time Properties - timedate.cpl
DDE Shares - ddeshare
Device Manager - devmgmt.msc
Direct X Control Panel (If Installed)* - directx.cpl
Direct X Troubleshooter - dxdiag
Disk Cleanup Utility - cleanmgr
Disk Defragment - dfrg.msc
Disk Management - diskmgmt.msc
Disk Partition Manager - diskpart
Display Properties - control desktop
Display Properties - desk.cpl
Display Properties (w/Appearance Tab Preselected) - control color
Dr. Watson System Troubleshooting Utility - drwtsn32
Driver Verifier Utility - verifier
Event Viewer - eventvwr.msc
File Signature Verification Tool - sigverif
Findfast - findfast.cpl
Folders Properties - control folders
Fonts - control fonts
Fonts Folder - fonts
Free Cell Card Game - freecell
Game Controllers - joy.cpl
Group Policy Editor (XP Prof) - gpedit.msc
Hearts Card Game - mshearts
Iexpress Wizard - iexpress
Indexing Service - ciadv.msc
Internet Explorer – iexplore
Internet Properties - inetcpl.cpl

Sunday, April 24, 2011

Use the Notepad as your personal diary

0 comments


There is a simple feature in Notepad that can make it work like a personal diary for you.Here is how to go about it:

1.Firstly open a blank Notepad file.
2. Now write .LOG as the first line in the file, then press enter. Now save the file and close it.
3.Open the notepad file now and you will find that the current date and time has been
appended (put) at the end and the cursor is in the next line.
4. Type your notes and then save and close the file.
5. Each time you open the file, Notepad repeats the process,that is it appends the date and time
to the end of the file and places the cursor below it.

[All windows XP commands]

0 comments
* CONTROL: opens the control panel window
* CONTROL ADMINTOOLS: opens the administrative tools
* CONTROL KEYBOARD: opens keyboard properties
* CONTROL COLOUR: opens display properties.Appearance tab
* CONTROL FOLDERS: opens folder options
* CONTROL FONTS: opens font policy management
* CONTROL INTERNATIONAL or INTL.CPL: opens Regional and Language option
* CONTROL MOUSE or MAIN.CPL: opens mouse properties
* CONTROL USERPASSWORDS: opens User Accounts editor
* CONTROL USERPASSWORDS2 or NETPLWIZ: User account access restrictions
* CONTROL PRINTERS: opens faxes and printers available
* APPWIZ.CPL: opens Add or Remove programs utility tool
* OPTIONALFEATURES: opens Add or Remove Windows component utility
* DESK.CPL: opens display properties. Themes tab
* HDWWIZ.CPL: opens add hardware wizard
* IRPROPS.CPL: infrared utility tool
* JOY.CP: opens game controllers settings
* MMSYS.CPL: opens Sound and Audio device Properties. Volume tab
* SYSDM.CPL: opens System properties
* TELEPHON.CPL: Opens phone and Modem options
* TIMEDATE.CPL: Date and Time properties
* WSCUI.CPL: opens Windows Security Center
* ACCESS.CPL: opens Accessibility Options
* WUAUCPL.CPL: opens Automatic Updates
* POWERCFG.CPL: opens Power Options Properties
* AZMAN.MSC: opens authorisation management utility tool
* CERTMGR.MSC: opens certificate management tool
* COMPMGMT.MSC: opens the Computer management tool
* COMEXP.MSC or DCOMCNFG: opens the Computer Services management tool
* DEVMGMT.MSC: opens Device Manager
* EVENTVWR or EVENTVWR.MSC: opens Event Viewer
* FSMGMT.MSC: opens Shared Folders
* NAPCLCFG.MSC: NAP Client configuration utility tool
* SERVICES.MSC: opens Service manager
* TASKSCHD.MSC or CONTROL SCHEDTASKS: opens Schedule Tasks manager
* GPEDIT.MSC: opens Group Policy utility tool
* LUSRMGR.MSC: opens Local Users and Groups
* SECPOL.MSC: opens local security settings
* CIADV.MSC: opens indexing service
* NTMSMGR.MSC: removable storage manager
* NTMSOPRQ.MSC: removable storage operator requests
* WMIMGMT.MSC: opens (WMI) Window Management Instrumentation
* PERFMON or PERFMON.MSC: opens the Performance monitor
* MMC: opens empty Console
* MDSCHED: opens memory diagnostics tools
* DXDIAG: opens DirectX diagnostics tools
* ODBCAD32: opens ODBC Data source Administrator
* REGEDIT or REGEDT32: opens Registry Editor
* DRWTSN32: opens Dr. Watson
* VERIFIER: opens Driver Verifier Manager
* CLICONFG: opens SQL Server Client Network Utility
* UTILMAN: opens Utility Manager
* COLORCPL: opens color management
* CREDWIZ: back up and recovery tool for user passwords
* MOBSYNC: opens Synchronization center
* MSCONFIG: opens System Configuration Utility
* SYSEDIT: opens System Configuration Editor (careful while using this command)
* SYSKEY: Windows Account Database Security management (careful while using this command)


Windows utility and applications

* EPLORER: Opens windows Explorer
* IEXPLORER: Opens Internet explorer
* WAB: opens Contacts
* CHARMAP: opens Character Map
* WRITE: opens WordPad
* NOTEPAD: opens Notepad
* CALC: opens Calculator
* CLIPBRD: opens Clipboard Viewer-> Vista Has no ClipBoard..
* WINCHAT: opens Microsoft Chat Interface
* SOUNDRECORDER: opens sound recording tool
* DVDPLAY: run CD or DVD
* WMPLAYER: opens Windows Media Player
* MOVIEMK: Opens untitled Windows Movie Maker
* OSK: opens on-screen Keyboard
* MAGNIFY: opens Magnifier
* WINCAL: opens Calendar
* DIALER: opens phone Dialer
* EUDCEDIT: opens Private Character Editor
* NDVOL: opens the mixer volume
* RSTRUI : opens Tool System Restore (For Vista only)
* %WINDIR%\SYSTEM32\RESTORE\rstrui.exe: opens Tool System Restore (for XP only).
* MSINFO32: Opens the System Information
* MRT : launches the utility removal of malware.
* Taskmgr : Opens the Windows Task Manager
* CMD: opens a command prompt
* MIGWIZ: Opens the tool for transferring files and settings from Windows (Vista only)
* Migwiz.exe: Opens the tool for transferring files and settings from Windows (for XP only)
* SIDEBAR: Open the Windows (Vista only)
* Sigverif : Opens the tool for verification of signatures of files
* Winver : Opens the window for your Windows version
* FSQUIRT: Bluetooth Transfer Wizard
* IExpress opens the wizard for creating self-extracting archives. Tutorial HERE
* MBLCTR: opens the mobility center (Windows Vista only)
* MSRA : Opens the Windows Remote Assistance
* Mstsc : opens the tool connection Remote Desktop
* MSDT: opens the diagnostic tools and support Microsoft
* WERCON: opens the reporting tool and solutions to problems (for Vista only)
* WINDOWSANYTIMEUPGRADE: Enables the upgrade of Windows Vista
* WINWORD : opens Word (if installed)
* PRINTBRMUI : Opens migration wizard printer (Vista only)


Disk management

* DISKMGMT.MSC: opens disk management utility
* CLEANMGR: opens disk drive clean up utility
* DFRG.MSC: opens disk defragmenter
* CHKDSK: complete analysis of disk partition
* DISKPART: disk partitioning tool


Connection management

* IPCONFIG: list the configuration of IP addresses on your PC (for more information type IPCONFIG/? in the CMD menu)
* INETCPL.CPL: opens internet properties
* FIREWALL.CPL: opens windows firewall
* NETSETUP.CPL: opens network setup wizard


Miscellaneous commands

* JAVAWS: View the cover of JAVA software (if installed)
* AC3FILTER.CPL: Opens the properties AC3 Filter (if installed)
* FIREFOX: Mozilla launches Firefox (if installed)
* NETPROJ: allow or not connecting to a network projector (For Vista only)
* LOGOFF: closes the current session
* SHUTDOWN: shut down Windows
* SHUTDOWN-A: to interrupt Windows shutdown
* %WINDIR% or %SYSTEMROOT%: opens the Windows installation
* %PROGRAMFILES%: Opens the folder where you installed other programs (Program Files)
* %USERPROFILE%: opens the profile of the user currently logged
* %HOMEDRIVE%: opens the browser on the partition or the operating system is installed
* %HOMEPATH%: opens the currently logged user C: \ Documents and Settings \ [username]
* %TEMP%: opens the temporary folder
* VSP1CLN: deletes the cache for installation of the service pack 1 for Vista


CMD Prompt!

* System File Checker (Requires Windows CD if the cache is not available):
o SFC / scannow: immediately scans all system files and repairs damaged files
o SFC / VERIFYONLY: scans only those files system
o SFC / Scanfil = "name and file path": scans the specified file, and repaired if damaged
o SFC / VERIFYFILE = "name and file path": Scans only the file specified
o SFC / scanonce: scans the system files on the next restart
o SFC / REVERT: return the initial configuration (For more information, type SFC /? In the command prompt CMD

Thursday, April 21, 2011

how to hide a file in a image

0 comments
Steps :
=====

1. Gather the file you wish to bind, and the image file, and place them in a folder. For the sake of this demonstration, I will be using C:\New Folder -The image will hereby be referred to in all examples as fluffy.jpg -The file will hereby be referred to in all examples as New Text Document.txt

2. Add the file/files you will be injecting into the image into a WinRar .rar or .zip. From here on this will be referred to as (secret.rar)

3. Open command prompt by going to Start > Run > cmd

4. In Command Prompt, navigate to the folder where your two files are by typing cd location [ex: cd C:\New Folder]

5. Type [copy /b fluffy.jpg + secret.rar fluffy.jpg] (remove the brackets) Congrats, as far as anyone viewing is concerned, this file looks like a JPEG, acts like a JPEG, and is a JPEG, yet it now contains your file. In order to view/extract your file, there are two options that you can take a) Change the file extension from fluffy.jpg to fluffy.rar, then open and your file is there b) Leave the file extension as is, right click, open with WinRar and your file is there


Video Link :
=======

http://www.youtube.com/watch?v=3Blt9-ojabk

Wednesday, April 20, 2011

All Keyboard Shortcuts

0 comments

  • 1.) Windows Hotkeys :
    ==============

    * Shift + F10 right-clicks.
    * Win + L (XP Only): Locks keyboard. Similar to Lock Workstation.
    * Win + F or F3: Open Find dialog. (All Files) F3 may not work in some applications which use F3 for their own find dialogs.
    * Win + Control + F: Open Find dialog. (Computers)
    * Win + U: Open Utility Manager.
    * Win + F1: Open Windows help.
    * Win + Pause: Open System Properties dialog.
    * Win + Tab: Cycle through taskbar buttons. Enter clicks, AppsKey or Shift + F10 right-clicks.
    * Win + Shift + Tab: Cycle through taskbar buttons in reverse.
    * Alt + Tab: Display CoolSwitch. More commonly known as the AltTab dialog.
    * Alt + Shift + Tab: Display CoolSwitch; go in reverse.
    * Alt + Escape: Send active window to the bottom of the z-order.
    * Alt + Shift + Escape: Activate the window at the bottom of the z-order.
    * Alt + F4: Close active window; or, if all windows are closed, open shutdown dialog.
    * Shift while a CD is loading: Bypass AutoPlay.
    * Shift while login: Bypass startup folder. Only those applications will be ignored which are in the startup folder, not those started from the registry (MicrosoftWindowsCurrentVersionRun)
    * Ctrl + Alt + Delete or Ctrl + Alt + NumpadDel (Both NumLock states): Invoke the Task Manager or NT Security dialog.
    * Ctrl + Shift + Escape (2000/XP ) or (Ctrl + Alt + NumpadDot) : Invoke the task manager. On earlier OSes, acts like Ctrl + Escape.
    * Printscreen: Copy screenshot of current screen to clipboard.
    * Alt + Printscreen: Copy screenshot of current active window to clipboard.
    * Ctrl + Alt + Down Arrow: Invert screen. Untested on OSes other than XP.
    * Ctrl + Alt + Up Arrow: Undo inversion.
    * Win + B : Move focus to systray icons.


    2.) Generic :
    ========

    * Ctrl + C or Ctrl + Insert: Copy.
    * Ctrl + X or Shift + Delete: Cut.
    * Ctrl + V or Shift + Insert: Paste/Move.
    * Ctrl + N: New... File, Tab, Entry, etc.
    * Ctrl + S: Save.
    * Ctrl + O: Open...
    * Ctrl + P: Print.
    * Ctrl + Z: Undo.
    * Ctrl + A: Select all.
    * Ctrl + F: Find...
    * Ctrl+W : to close the current window
    * Ctrl + F4: Close tab or child window.
    * F1: Open help.
    * F11: Toggle full screen mode.
    * Alt or F10: Activate menu bar.
    * Alt + Space: Display system menu. Same as clicking the icon on the titlebar.
    * Escape: Remove focus from current control/menu, or close dialog box.


    3.) Generic Navigation :
    ===============

    * Tab: Forward one item.
    * Shift + Tab: Backward one item.
    * Ctrl + Tab: Cycle through tabs/child windows.
    * Ctrl + Shift + Tab: Cycle backwards through tabs/child windows.
    * Enter: If a button's selected, click it, otherwise, click default button.
    * Space: Toggle items such as radio buttons or checkboxes.
    * Alt + (Letter): Activate item corresponding to (Letter). (Letter) is the underlined letter on the item's name.
    * Ctrl + Left: Move cursor to the beginning of previous word.
    * Ctrl + Right: Move cursor to the beginning of next word.
    * Ctrl + Up: Move cursor to beginning of previous paragraph. This and all subsequent Up/Down hotkeys in this section have only been known to work in RichEdit controls.
    * Ctrl + Down: Move cursor to beginning of next paragraph.
    * Shift + Left: Highlight one character to the left.
    * Shift + Right: Highlight one character to the right.
    * Shift + Up: Highlight from current cursor position, to one line up.
    * Shift + Down: Highlight from current cursor position, to one line down.
    * Ctrl + Shift + Left: Highlight to beginning of previous word.
    * Ctrl + Shift + Right: Highlight to beginning of next word.
    * Ctrl + Shift + Up: Highlight to beginning of previous paragraph.
    * Ctrl + Shift + Down: Highlight to beginning of next paragraph.
    * Home: Move cursor to top of a scrollable control.
    * End: Move cursor to bottom of a scrollable control.


    4.) Generic File Browser :
    ================

    * Arrow Keys: Navigate.
    * Shift + Arrow Keys: Select multiple items.
    * Ctrl + Arrow Keys: Change focus without changing selection. "Focus" is the object that will run on Enter. Space toggles selection of the focused item.
    * (Letter): Select first found item that begins with (Letter).
    * BackSpace: Go up one level to the parent directory.
    * Alt + Left: Go back one folder.
    * Alt + Right: Go forward one folder.
    * Enter: Activate (Double-click) selected item(s).
    * Alt + Enter: View properties for selected item.
    * F2: Rename selected item(s).
    * Ctrl + NumpadPlus: In a Details view, resizes all columns to fit the longest item in each one.
    * Delete: Delete selected item(s).
    * Shift + Delete: Delete selected item(s); bypass Recycle Bin.
    * Ctrl while dragging item(s): Copy.
    * Ctrl + Shift while dragging item(s): Create shortcut(s).
    * In tree pane, if any:
    * Left: Collapse the current selection if expanded, or select the parent folder.
    * Right: Expand the current selection if collapsed, or select the first subfolder.
    * NumpadAsterisk: Expand currently selected directory and all subdirectories. No undo.
    * NumpadPlus: Expand currently selected directory.
    * NumpadMinus: Collapse currently selected directory.


    5.) Accessibility :
    ===========

    * Right Shift for eight seconds: Toggle FilterKeys on and off. FilterKeys must be enabled.
    * Left Alt + Left Shift + PrintScreen: Toggle High Contrast on and off. High Contrast must be enabled.
    * Left Alt + Left Shift + NumLock: Toggle MouseKeys on and off. MouseKeys must be enabled.
    * NumLock for five seconds: Toggle ToggleKeys on and off. ToggleKeys must be enabled.
    * Shift five times: Toggle StickyKeys on and off. StickyKeys must be enabled.
    * 6.) Microsoft Natural Keyboard with IntelliType Software Installed
    * Win + L: Log off Windows.
    * Win + P: Open Print Manager.
    * Win + C: Open control panel.
    * Win + V: Open clipboard.
    * Win + K: Open keyboard properties.
    * Win + I: Open mouse properties.
    * Win + A: Open Accessibility properties.
    * Win + Space: Displays the list of Microsoft IntelliType shortcut keys.
    * Win + S: Toggle CapsLock on and off.


    7.) Remote Desktop Connection Navigation :
    ============================

    * Ctrl + Alt + End: Open the NT Security dialog.
    * Alt + PageUp: Switch between programs.
    * Alt + PageDown: Switch between programs in reverse.
    * Alt + Insert: Cycle through the programs in most recently used order.
    * Alt + Home: Display start menu.
    * Ctrl + Alt + Break: Switch the client computer between a window and a full screen.
    * Alt + Delete: Display the Windows menu.
    * Ctrl + Alt + NumpadMinus: Place a snapshot of the entire client window area on the Terminal server clipboard and provide the same functionality as pressing Alt + PrintScreen on a local computer.
    * Ctrl + Alt + NumpadPlus: Place a snapshot of the active window in the client on the Terminal server clipboard and provide the same functionality as pressing PrintScreen on a local computer.


    8.) Mozilla Firefox Shortcuts :
    ==================

    * Ctrl + Tab or Ctrl + PageDown: Cycle through tabs.
    * Ctrl + Shift + Tab or Ctrl + PageUp: Cycle through tabs in reverse.
    * Ctrl + (1-9): Switch to tab corresponding to number.
    * Ctrl + N: New window.
    * Ctrl + T: New tab.
    * Ctrl + L or Alt + D or F6: Switch focus to location bar.
    * Ctrl + Enter: Open location in new tab.
    * Shift + Enter: Open location in new window.
    * Ctrl + K or Ctrl + E: Switch focus to search bar.
    * Ctrl + O: Open a local file.
    * Ctrl + W: Close tab, or window if there's only one tab open.
    * Ctrl + Shift + W: Close window.
    * Ctrl + S: Save page as a local file.
    * Ctrl + P: Print page.
    * Ctrl + F or F3: Open find toolbar.
    * Ctrl + G or F3: Find next...
    * Ctrl + Shift + G or Shift + F3: Find previous...
    * Ctrl + B or Ctrl + I: Open Bookmarks sidebar.
    * Ctrl + H: Open History sidebar.
    * Escape: Stop loading page.
    * Ctrl + R or F5: Reload current page.
    * Ctrl + Shift + R or Ctrl + F5: Reload current page; bypass cache.
    * Ctrl + U: View page source.
    * Ctrl + D: Bookmark current page.
    * Ctrl + NumpadPlus or Ctrl + Equals (+/=): Increase text size.
    * Ctrl + NumpadMinus or Ctrl + Minus: Decrease text size.
    * Ctrl + Numpad0 or Ctrl + 0: Set text size to default.
    * Alt + Left or Backspace: Back.
    * Alt + Right or Shift + Backspace: Forward.
    * Alt + Home: Open home page.
    * Ctrl + M: Open new message in integrated mail client.
    * Ctrl + J: Open Downloads dialog.
    * F6: Switch to next frame. You must have selected something on the page already, e.g. by use of Tab.
    * Shift + F6: Switch to previous frame.
    * Apostrophe ('): Find link as you type.
    * Slash (/): Find text as you type.


    9.) GMail :
    =======

    * Note: Must have "keyboard shortcuts" on in settings.
    * C: Compose new message.
    * Shift + C: Open new window to compose new message.
    * Slash (/): Switch focus to search box.
    * K: Switch focus to the next most recent email. Enter or "O" opens focused email.
    * J: Switch focus to the next oldest email.
    * N: Switch focus to the next message in the "conversation." Enter or "O" expands/collapses messages.
    * P: Switch focus to the previous message.
    * U: Takes you back to the inbox and checks for new mail.
    * Y: Various actions depending on current view:
    * Has no effect in "Sent" and "All Mail" views.
    * Inbox: Archive email or message.
    * Starred: Unstar email or message.
    * Spam: Unmark as spam and move back to "Inbox."
    * Trash: Move back to "Inbox."
    * Any label: Remove the label.
    * X: "Check" an email. Various actions can be performed against all checked emails.
    * S: "Star" an email. Identical to the more familiar term, "flagging."
    * R: Reply to the email.
    * A: Reply to all recipients of the email.
    * F: Forward an email.
    * Shift + R: Reply to the email in a new window.
    * Shift + A: Reply to all recipients of the email in a new window.
    * Shift + F: Forward an email in a new window.
    * Shift + 1 (!): Mark an email as spam and remove it from the inbox.
    * G then I: Switch to "Inbox" view.
    * G then S: Switch to "Starred" view.
    * G then A: Switch to "All Mail" view.
    * G then C: Switch to "Contacts" view.
    * G then S: Switch to "Drafts" view.


    10.) List of F1-F9 Key Commands for the Command Prompt :
    =====================================

    * F1 / right arrow: Repeats the letters of the last command line, one by one.
    * F2: Displays a dialog asking user to "enter the char to copy up to" of the last command line
    * F3: Repeats the last command line
    * F4: Displays a dialog asking user to "enter the char to delete up to" of the last command line
    * F5: Goes back one command line
    * F6: Enters the traditional CTRL+Z (^z)
    * F7: Displays a menu with the command line history
    * F8: Cycles back through previous command lines (beginning with most recent)
    * F9: Displays a dialog asking user to enter a command number, where 0 is for first command line entered.
    * Alt+Enter: toggle fullScreen mode.
    * up/down: scroll thru/repeat previous entries
    * Esc: delete line
    * Note: The buffer allows a maximum of 50 command lines. After this number is reached, the first line will be replaced in sequence.

    about 6 months ago · Report

  • 1. F1 Help
    2. F2 Rename an item
    3. F3 Open files
    4. ALT+F4 Close window or quit program
    5. F10 Activate the menu bar in a program
    6. CTRL+ ESC open start menu, use the arrow keys to select an item, or TAB to select the taskbar
    7. ALT+ TAB Return to previous program, or hold down the ALT key while repeatedly pressing tab to cycle through open programs
    8. SHIFT+ DEL delete items permanently without sending to recycle bin
    9. CTRL+ A Highlight all the items in window
    10. CTRL+ C Copy
    11. CTRL+ X Cut
    12. CTRL+ V Paste
    13. CTRL+ Z Undo
    14. CTRL+ Y Redo
    15. Home Jumps to the beginning of the page
    16. END Jumps to the end of the page
    17. ESC Stops the current page from loading
    18. F11 Toggles full screen view
    19. ALT+ LEFT ARROW Goes back to the previous page
    20. ALT+ RIGHT ARROW Goes forward to the next page
    21. ALT+ Home Goes to your Home page
    22. CTRL+ N Opens a new browser window
    23. CTRL+ W Closes the active window
    24. CTRL+ O Opens the address book
    25. CTRL+ R Reloads the current page
    26. CTRL+ B Opens the Organized Favorites or Bookmarks windows
    27. CTRL+ D Add the current page to your Favorites or Bookmarks
    28. CTRL+ H Opens the history folder
    29. CTRL+ F Finds text on the current page
    30. CTRL+ A Select all
    31. CTRL+ B Bold
    32. CTRL+ C Copy
    33. CTRL+ E Justify center
    34. CTRL+ I Italics
    35. CTRL+ J Justify full
    36. CTRL+ L Justify Left
    37. CTRL+ M Indent
    38. CTRL+ Q Remove paragraph Formatting
    39. CTRL+ R Justify right
    40. CTRL+ T Margin release
    41. CTRL+ U Underline
    These keys combos can be used to do other operations:-
    42. CTRL+ D Opens Font Dialog Box
    43. CTRL+ F Find
    44. CTRL+ G Go to page, section, line, heading etc
    45. CTRL+ H Find and replace
    46. CTRL+ K Insert Hyperlink
    47. CTRL+ N Open a new document
    48. CTRL+ O Open an existing document
    49. CTRL+ S Save
    50 CTRL+ W Close an existing document
    51. CTRL+ Y Redo
    52. CTRL+ Z Undo
    Besides the alphabet keys, a combination of other keys also helps:-
    53. CTRL+ LEFT ARROW Jumps one word left
    54. CTRL+ RIGHT ARROW Jumps one word right
    55. CTRL+ DOWN ARROW Jumps one para down
    56. CTRL+ UP ARROW Jumps one para up
    57. CTRL+ BACKSPACE Delete one word left
    58. CTRL+ DELETE Delete one word right
    59. CTRL+ PAGE UP To the beginning of the previous page
    60. CTRL+ PAGE DOWN to the beginning of the next page
    61. CTRL+ P Print Dialog box

Tuesday, April 19, 2011

How to change the text on the start button (will only work on windows XP

0 comments
How to change the text on the start button

First go to http://www.download.com/

On the search bar type "resource hacker"
In the search results there will be a option called *Resource Hacker 3.4* without asterisk *
Click on that
Then click on download
It will begin downloading a ZIP file so you only need to extract
Next extract thee files
When you've done that open resource hacker
Then go to file -> open
Open C:/WINDOWS/explorer
Some files should appear in resource hacker
Click on *String Table* without asterisk *
then would be a number of numbers coming
Click on *37* without asterisk *
Now the number 1033 will be appearing below the number 37
Click on 1033
Some scripts should be coming on the right side
click on "start"(in the script) and name it whatever you want
Then click on *Compile Script* without asterisk
Then save it in WINDOWS and name it whatever you want but it should end with .exe
e.g-example.exe
now go to start -> run and type in *regedit* without asterisk
Now in that go to HKEY_LOCAL_MACHINE
in that go to software
in that click on Microsoft
in that click on Windows NT
in that click on current vision
in that click on Winlogon
you will find many options on the right
in those options find Shell
double click on it and change the value data to what you named the the file from resource hacker
now click on Ok
now close registry edit and restart your computer
And there you go..!!!!

Thanks,

Shut-down The Computer After Conveying Any Message

0 comments
This one is kind of an annoying trick and if used unknowingly can certainly cause problems (am serious). What this trick does is, after conveying a (any) message it shuts down the computer without any confirmation. In order to create the Shutdown file, follow the below mentioned steps:


Open Notepad.
Paste the following code in it:


@echo off
msg * Its time to get some rest.
shutdown -c “Error! You have to take rest! Byeeeeee” -s


Save the file with any name but with .bat extension and close it. For eg. TakeRest.bat

NOTE : Use this carefully. If you are playing prank then keep in mind that this may lead to loss as it shuts down the computer forcefully

How to put your name beside the time on the right bottom of your screen

0 comments
Go to start -> control panel
then go to regional & language settings
click on customize
then click on time
beside AM and PM write your name and click on apply
then okay
And there you have it...

Monday, April 18, 2011

Simplest way to hide Folders

0 comments
In this post i want to show you a very simple, but really cool and pretty useful trick to keep folders hidden, and best of all, no software needed.

Its really easy... just follow these steps:

1. Create a new folder somewhere on your hard drive.


2. When you name it hold down "Alt" and press "0160" this will create and invisible space so it will appears as if it has no name.


3. Right click it and select "Properties" select the tab "coustimize" and select "change icon" scroll along and you should a few blanc spaces click on any one and click ok and save it.


4. When you have saved the settings the folder will be invisible to hide all your personal file

Sunday, April 17, 2011

How to make your computer faster

0 comments
Go to notepad
write this in:

*mystring=(80000000)* without asterisk *

save it on your desktop and name it *ram.vbe* without asterisk *

now close notepad and double click on ram.vbe

nothing will open but your computer will get faster

INSTALL XP IN ABOUT 20 MINS

0 comments
Now, this tip will be very helpful for those who frequently install windows xp operating system. Normally OS installation takes around 40 minutes to complete, but through this trick you can now save 10-15 minutes. This simple tricks goes this way.

1. Boot through Windows XP CD.

2. After all the files are completely loaded, you get the option to select the partition. Select “c”.
3. Now Format the partition, whether it is normal or quick with NTFS or FAT
4. Once the formatting is completed, All the setup files required for installation are copied. Restart your system by pressing Enter.
Now, here begins the Simple trick to save 10-15 minutes.
5. After rebooting, you get a screen where it takes 40 minutes to complete or finalize the OS installation.
6. Now, Press SHIFT + F10 Key -> This opens command prompt.
7. Enter “Taskmgr” at the command prompt window. This will open Task Manager.
8. Click the Process Tab, here we find a process called Setup.exe -> Right Click on Setup.exe -> Set Priority -> Select High or Above Normal. Initially it will be Normal.
Thats it, no more work to do. Relax your self and see how fast the installation process completes

How to do your desktop Look Like Webiste

0 comments
How to do your Desktop Look Like Website

Click Start-->Run-->Notepad

Copy/Paste This html In Notepad

<html>
<body>

<iframe
src="http://www.google.com/"
width="100%" height="100%">
</iframe>

</body>
</html|

Now save as index.html
Then Click on desktop-->properties-->desktop-->browse--> and Click
in html that you saved . And Click Open . Now Click Apply and OK
Your desktop will to be look like website that you can search .
If want to change your site , just change the URL in your html .
Change this google and write facebook if you want and save as again and
do the same work . :) :)